Best Cross-Chain Bridging Tutorial
Best Cross-Chain Bridging Tutorial: Step-by-Step Guide
In the early days of cryptocurrency, the landscape was largely dominated by a few isolated islands. Bitcoin existed in its own realm, while Ethereum created a separate ecosystem for decentralized applications. As the industry matured, hundreds of new blockchains emerged, each offering unique benefits such as higher speeds, lower costs, or specialized features for gaming and decentralized finance (DeFi). However, this growth created a fragmentation problem: how does a user move value from one blockchain to another without going back to a centralized exchange?
This is where cross-chain bridging comes into play. In simple terms, a bridge is a digital corridor that allows different, independent blockchains to communicate and share data or assets. Whether you want to move your assets from Ethereum to a faster Layer 2 network, access a specific DeFi protocol only available on a niche chain, or purchase an NFT on a different network, bridging is the essential skill you need to navigate the modern multi-chain world.
This tutorial serves as a comprehensive guide to understanding and using cross-chain bridges. By the end of this article, you will have a deep understanding of the underlying mechanics, the risks involved, and a practical, step-by-step framework to move your assets across the crypto landscape safely and efficiently.
What Is Cross-Chain Bridging?
To understand cross-chain bridging, we must first look at the concept of blockchain interoperability. Interoperability refers to the ability of different blockchain networks to exchange information and value. By design, blockchains are closed systems. They are isolated ledgers that do not naturally “see” or interact with data outside their own network rules and consensus mechanisms. Without a bridge, an asset on the Solana network is functionally invisible to the Ethereum network.
Bridges act as the vital connectors that break down these walls. They function as a translation layer or a middleman that ensures that when you “send” an asset from one chain to another, the value is accurately reflected on the destination chain while being accounted for on the source chain.
There are several ways to categorize these bridges. The most fundamental distinction is between trusted and trustless bridges. Trusted (or custodial) bridges rely on a central entity or a set of federated nodes to hold the assets and verify the transfer. These are often faster and cheaper but require the user to trust a third party with their funds. Trustless (or decentralized) bridges rely on smart contracts and algorithms to manage the process. In a trustless model, the security is derived from the underlying code rather than a company or individual.
Additionally, we distinguish between native bridges and third-party bridges. A native bridge is typically built by the developers of a specific blockchain to facilitate movement into their own ecosystem. A third-party bridge is an independent platform designed to support dozens of different networks simultaneously, offering greater flexibility and a more unified user experience.
How Cross-Chain Bridges Work
The underlying mechanics of a bridge can be complex, but they generally fall into three primary models. Understanding these models helps users grasp where their funds are at any given moment during the transaction.
The Lock-and-Mint Model
This is the most common mechanism for moving assets. When you want to move a token from Chain A to Chain B, the bridge requires you to deposit your original tokens into a specific smart contract on Chain A. Once the bridge confirms the deposit, it “locks” those tokens. Simultaneously, the bridge triggers a contract on Chain B to “mint” an equivalent amount of “wrapped” tokens. These wrapped tokens represent your original asset and maintain its value because they are backed 1:1 by the collateral locked on the source chain. When you want to return, the wrapped tokens are burned on Chain B, and the original tokens are unlocked on Chain A.
The Burn-and-Release Model
In this scenario, instead of locking the tokens, the bridge permanently destroys (burns) the tokens on the source chain. After the burn is verified, the bridge releases an equivalent amount of tokens from a pre-existing pool on the destination chain. This model is often used when a token exists natively on multiple chains and there is no need for “wrapping.”
Liquidity Pool-Based Bridges
Some bridges operate as specialized decentralized exchanges. They maintain large pools of liquidity (e.g., USDC) on both the source and destination chains. When you bridge, you are essentially swapping your USDC on Chain A for someone else’s USDC on Chain B. The bridge protocol manages the rebalancing of these pools. This method is often faster because it avoids the minting process, but it is limited by the amount of liquidity available in the pools.
The general flow for a user follows a simple three-step logic:
-
The user initiates a transaction and sends the token on the source chain.
-
The bridge validates the transaction and locks or burns the asset.
-
The bridge confirms the event and mints or unlocks the equivalent asset on the destination chain.
Why Use Cross-Chain Bridges?
As the crypto ecosystem expands, the reasons to bridge become more compelling for both retail users and institutional investors.
Accessing Diverse Ecosystems
Each blockchain has its own culture and application set. Some networks are hubs for high-speed gaming, while others are the primary venues for sophisticated lending protocols. Bridging allows you to take your capital to where the best opportunities reside. For example, if a new decentralized exchange on a Layer 2 network offers significantly higher yields for liquidity providers, you would use a bridge to move your stablecoins there to capitalize on those rewards.
Lower Transaction Fees and Higher Speeds
Ethereum’s mainnet is known for high security but often suffers from high gas fees during periods of peak activity. By bridging assets to a Layer 2 solution or an alternative Layer 1, users can perform hundreds of transactions for the price of one transaction on the mainnet. This makes DeFi accessible to those who are not “whales” and allows for high-frequency trading or small-scale NFT flipping that would otherwise be unprofitable.
Portfolio Diversification and Arbitrage
Bridging allows for sophisticated financial strategies. Users can diversify their risk across different network consensus models. Furthermore, price discrepancies for the same asset can exist between different chains. Professional traders use bridges to move assets quickly between chains to take advantage of these price differences, a process known as arbitrage, which ultimately helps keep prices stable across the entire market.
Popular Cross-Chain Bridges
Selecting the right bridge depends on your specific needs, the chains you are using, and your risk tolerance. Here are some of the most prominent types of bridges currently in operation.
Multi-Chain Bridges
General-purpose bridges support a vast array of blockchains, including both Ethereum-compatible (EVM) and non-EVM chains like Solana or Cosmos.
-
Key Features: Wide compatibility, high liquidity, and often integrated with “bridge aggregators” that find the best rates.
-
Pros: One-stop shop for most bridging needs; user-friendly interfaces.
-
Cons: Can be targets for hackers due to the massive amount of value they hold; fees can vary significantly.
Ecosystem-Specific Bridges
These are often the “official” bridges built by the teams behind a specific network, such as the Arbitrum Bridge, the Optimism Gateway, or the Avalanche Bridge.
-
Key Features: High security as they are often more integrated with the network’s native architecture.
-
Pros: Generally considered the safest way to move assets into that specific ecosystem.
-
Cons: Often limited to only two chains (e.g., Ethereum to Arbitrum); withdrawal times can be longer (sometimes up to seven days for certain Layer 2 designs).
When to Use Which?
If you are moving a significant amount of capital, an ecosystem-specific bridge is often the preferred choice for its security profile. If you are a frequent DeFi user moving smaller amounts between various sidechains, a multi-chain bridge or an aggregator is more convenient and cost-effective.
Prerequisites Before Bridging
Before you initiate your first bridge transaction, you must ensure you have the necessary infrastructure in place. Rushing into a bridge transaction without the right tools is the primary cause of lost funds.
Crypto Wallet Setup
You need a non-custodial wallet that supports the networks you are interacting with. Most users prefer browser extension wallets or mobile wallets. Ensure your wallet is configured to “see” different networks. For EVM chains, this involves adding the Network Name, RPC URL, and Chain ID, which can often be done automatically via reputable tools or the bridge interface itself.
Native Tokens for Gas Fees
This is the most common hurdle for beginners. To perform a transaction on any blockchain, you must pay a gas fee in the network’s native token (e.g., ETH for Ethereum, SOL for Solana, MATIC for Polygon). When bridging, you need gas on the source chain to send the tokens. Importantly, you will also need a small amount of the native token on the destination chain to do anything with your tokens once they arrive. Some modern bridges offer “gas refuel” services that allow you to swap a portion of your bridged assets for gas tokens during the transfer.
Security Awareness
Always double-check the URL of the bridge you are using. Phishing sites often mimic popular bridges to steal wallet permissions. Additionally, always start with a small “test” amount. Even if you are moving thousands of dollars, send ten dollars first to ensure the path is clear and you understand the steps.
Step-by-Step Cross-Chain Bridging Tutorial
This section provides a practical walkthrough of a standard bridging transaction. While every interface is slightly different, the logic remains consistent across almost all platforms.
Step 1: Choose a Bridge
Begin by identifying which bridge supports your source and destination chains. Consider the reputation of the bridge, the current liquidity available for your specific token, and the estimated fees. Use a bridge aggregator if you want to compare multiple options side-by-side to find the cheapest or fastest route.
Step 2: Connect Your Wallet
Navigate to the bridge website and click the “Connect Wallet” button. You will be prompted by your wallet extension to approve the connection. This step allows the bridge to see your token balances; it does not give the bridge permission to move your funds yet. Ensure you are connected to the correct source network in your wallet app.
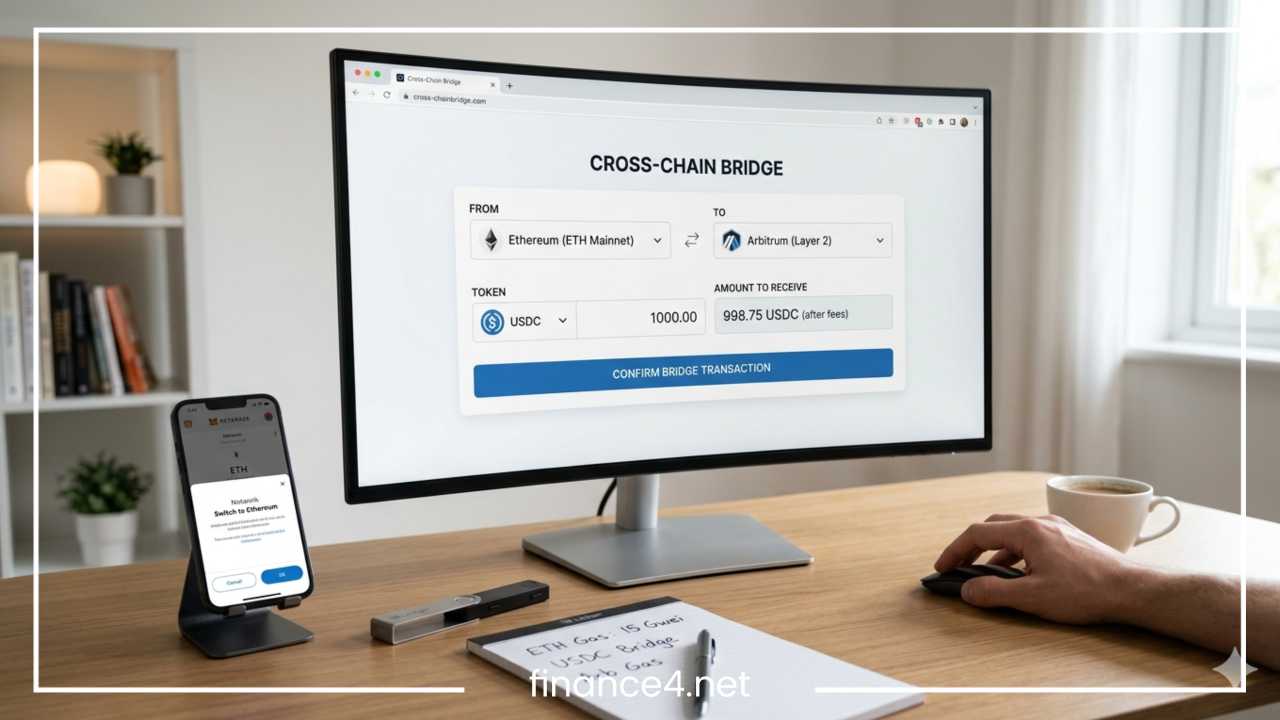
Step 3: Select Source and Destination Chains
In the bridge interface, there will be two dropdown menus. Select the chain where your funds currently reside (Source) and the chain where you want them to go (Destination). For example, you might select “Ethereum” as the source and “Arbitrum” as the destination.
Step 4: Choose Token and Amount
Select the specific token you wish to bridge (e.g., USDC, ETH, WBTC). Enter the amount. The bridge should automatically display the estimated amount you will receive on the destination chain after subtracting fees. Pay close attention to any “Minimum Received” or “Slippage” warnings.
Step 5: Approve Transaction
If this is your first time using a specific token with this bridge, you will likely need to perform an “Approve” transaction. This is a security feature in smart contracts where you grant the bridge permission to spend a specific amount of your tokens.
-
Note: The “Approve” transaction costs a small amount of gas on the source chain but does not actually move the funds. Once approved, the interface will change to allow the “Swap” or “Bridge” action.
Step 6: Confirm the Bridge Transaction
Once approved, click the main action button (often labeled “Bridge,” “Transfer,” or “Send”). Your wallet will pop up a second time asking you to confirm the actual transfer. This transaction will include the bridge fee and the network gas fee. After you click confirm, the bridge will begin processing. Depending on the bridge and network congestion, this can take anywhere from a few minutes to an hour.
Step 7: Verify Funds on Destination Chain
Once the bridge interface indicates the transaction is complete, switch your wallet to the destination network. If you do not see your tokens, you may need to manually “Import Token” by pasting the token’s contract address into your wallet. You can verify the success of the transaction by looking up your wallet address on a block explorer for the destination chain.
Fees Explained
Bridging is rarely free. There are four main types of costs you should account for to avoid surprises.
Gas Fees
You will pay gas on the source chain to initiate the transfer. If you are bridging from Ethereum, this can be expensive. Some bridges also require you to pay a gas fee for the destination chain transaction upfront, which the bridge then executes on your behalf.
Bridge Service Fees
Most third-party bridges charge a small percentage (e.g., 0.1% to 0.5%) of the total amount being bridged to maintain their infrastructure and liquidity.
Slippage
For liquidity-pool-based bridges, slippage occurs if your trade is large relative to the pool size. This results in receiving slightly fewer tokens than the current market rate suggests. Always check the “Expected Output” before confirming.
Hidden Costs
Watch out for withdrawal fees on the destination side. Some bridges require a second manual “claim” transaction on the destination chain, which will require more gas. Using a bridge that “pushes” the tokens directly to your wallet is usually more convenient.
Risks of Cross-Chain Bridging
While bridging is a powerful tool, it is one of the more technically risky activities in the crypto space.
Smart Contract Vulnerabilities
Bridges are essentially massive honeypots of locked capital. If the smart contract governing the bridge has a bug or a logic flaw, hackers can exploit it to drain the locked collateral. Historically, bridge hacks have accounted for some of the largest losses in the industry.
Centralization Risks
Many bridges use a multi-signature (multi-sig) wallet to manage funds. If the holders of these keys are compromised or act maliciously, the funds can be stolen. Always research how decentralized a bridge actually is before moving large amounts.
User Error
Blockchain transactions are irreversible. If you bridge tokens to a destination chain where the token is not supported, or if you send funds to the wrong address, they may be lost forever. Always verify that the destination wallet address is yours and that you have control over it on the target network.
Best Practices for Safe Bridging
To minimize risk and ensure a smooth experience, follow these industry-standard safety protocols.
-
Stick to Reputable Bridges: Use bridges that have undergone multiple third-party security audits and have a long track record of operation.
-
The Small-Amount Test: Never bridge your entire balance at once. Always send a small test transaction to confirm the bridge is working and that you know how to access the funds on the other side.
-
Revoke Permissions: After completing a bridge transaction, consider using a tool to revoke the “Approval” you gave the bridge. This prevents any future exploits of that bridge from affecting your remaining wallet balance.
-
Use Hardware Wallets: For significant amounts, use a hardware wallet. This adds an extra layer of physical security, as you must manually press a button to authorize the bridge transaction.
-
Check Network Status: Before bridging, check if either the source or destination network is experiencing downtime or heavy congestion, which can cause transactions to hang in limbo.
Troubleshooting Common Issues
Even with careful planning, issues can arise. Here is how to handle the most common problems.
Transaction Is Stuck
If your transaction is “pending” for a long time, check a block explorer. It’s possible the gas price spiked right as you sent it, and your transaction is stuck in the mempool. You can often “speed up” the transaction in your wallet by paying a slightly higher gas fee.
Funds Are Not Showing Up
First, ensure you are looking at the correct network in your wallet. If you are, and the block explorer says the transaction is successful, you likely just need to add the “Custom Token” to your wallet interface so it knows to display the balance.
Wrong Network Selected
If you sent funds to an exchange address via a bridge, and that exchange doesn’t support the destination network, you will need to contact the exchange’s support. This is a difficult situation and often results in lost funds, which is why bridging to your own non-custodial wallet is always recommended.
Future of Cross-Chain Technology
The future of bridging is moving toward “intent-centric” models and seamless interoperability. In the future, users may not even realize they are bridging. Protocols are being developed that allow a user to click a button on Chain A, and have the backend automatically handle the bridging, swapping, and execution on Chain B in a single click.
Furthermore, new security developments like Zero-Knowledge (ZK) proofs are being applied to bridges. ZK-bridges allow for the verification of transactions without relying on a central set of validators, potentially making bridging as secure as the underlying blockchains themselves. As Layer 2 solutions become more integrated, the friction of moving between them will continue to decrease.
Final Thoughts
Cross-Chain bridging is the key that unlocks the full potential of the decentralized web. It allows for a fluid, efficient, and interconnected financial system that isn’t limited by the boundaries of a single blockchain. While the process involves certain technical risks and a learning curve, following the steps and safety practices outlined in this guide will allow you to navigate the multi-chain ecosystem with confidence.
Remember to prioritize security, start with small amounts, and always keep enough native tokens for gas. As you become more comfortable with the process, you’ll find that the ability to move assets freely opens up a world of opportunities in DeFi, NFTs, and beyond.
FAQ: Common Questions About Cross-Chain Bridging
Are crypto bridges safe to use?
While many reputable bridges exist, no bridge is 100% safe. Because bridges hold large amounts of locked assets in smart contracts, they are high-value targets for hackers. Historically, bridge exploits have occurred due to smart contract bugs or centralization in the validation process. To stay safe, always use bridges that have undergone multiple security audits and have high Total Value Locked (TVL).
What is the cheapest way to bridge crypto?
The cheapest way to bridge crypto is typically to use a “bridge aggregator.” These tools compare multiple bridging routes in real-time to find the one with the lowest gas fees and service charges. Additionally, bridging between Layer 2 networks (like Arbitrum or Optimism) is significantly cheaper than bridging directly from the Ethereum mainnet.
How long does a cross-chain bridge transaction take?
A bridge transaction usually takes between 5 and 20 minutes, though this varies depending on the networks involved. The process requires two steps: first, the transaction must be confirmed on the source chain, and second, the bridge must “see” that confirmation and initiate the minting or release on the destination chain.
Can I bridge crypto directly from a centralized exchange?
Most centralized exchanges do not function as cross-chain bridges in the traditional sense, but they do allow “multi-chain withdrawals.” This means you can deposit a token via one network and withdraw it to another if the exchange supports both. However, for true DeFi applications, users typically move funds to a non-custodial wallet before using a dedicated bridge protocol.
What happens if my bridge transaction is stuck?
If a transaction is stuck, it is usually because the gas fee was set too low or the destination chain is experiencing high congestion. You can track your transaction status by pasting your transaction hash (TXID) into a dedicated bridge explorer. Most reputable bridges provide a support portal or a community Discord for troubleshooting.
Do I need gas on both chains to bridge?
Yes. You need the native gas token (e.g., ETH, SOL, or MATIC) on the source chain to “send” the transaction. Once the funds arrive on the destination chain, you will also need a small amount of that chain’s native token to move or swap your newly bridged assets.


